Now I really want to share knowledge to everyone about how to partition a Hard Drive in windows.
It sounds very difficult for users to partition hard drive, but don't worry, Windows 10 Disk Management tool and third-party free partition software like AOMEI Partition Assistant Standard will help you partition hard drive easily and safely.
Before you do
If the hard drive of your Windows 10 is MBR, please make sure how many partitions have been on hard drive? Due to MBR disk only supports maximum 3 primary partitions plus 1 extended partition or 4 primary partitions. If the number of partitions has reached the limitation, please learn how to convert primary partition to logical. However if your disk is GPT, there is no limitation for the number of partitions.
Method 1: Partition Hard Drive in Windows 10 with Disk Management Tool
Disk Management is a tool built in all Windows versions to manage hard disk partitions, such as create, delete and format partitions, change drive letter, shrink volume, extend volume and perform other disk-related tasks.
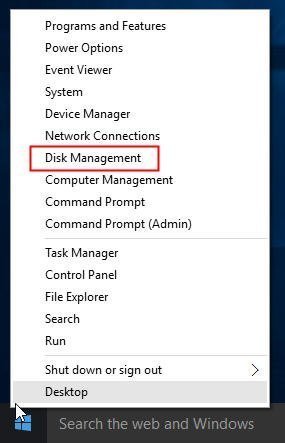
Step 1: To partition Windows 10 hard drive, let's get started from opening Disk Management Tool in Windows 10. The easiest way is to right click Start Menu and select "Disk Management".
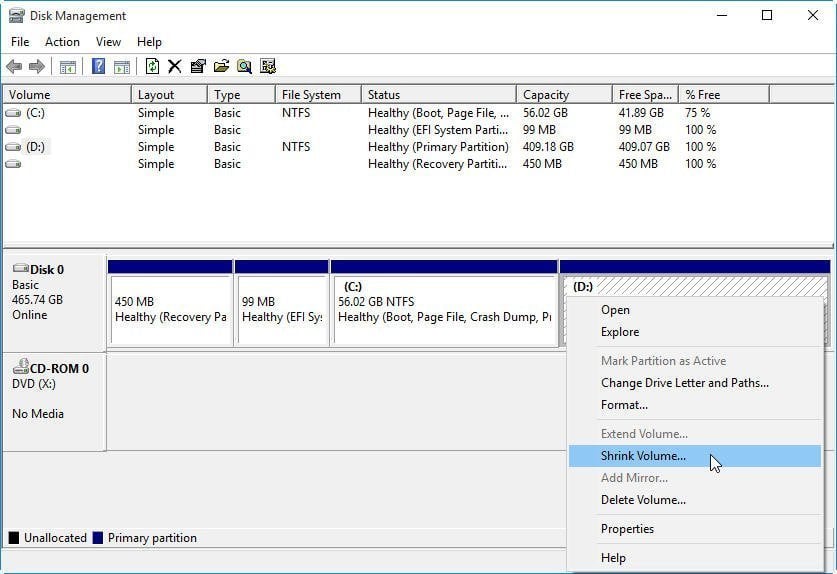
Step 2: Select the hard disk you want to partition. Right click a partition (here is D: drive) and select "Shrink Volume".
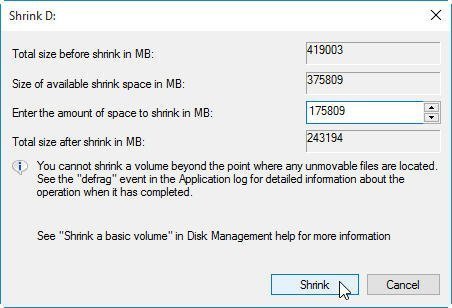
Step 3: In the pop-up window, you can modify the amount of space to shrink. And then click "Shrink".
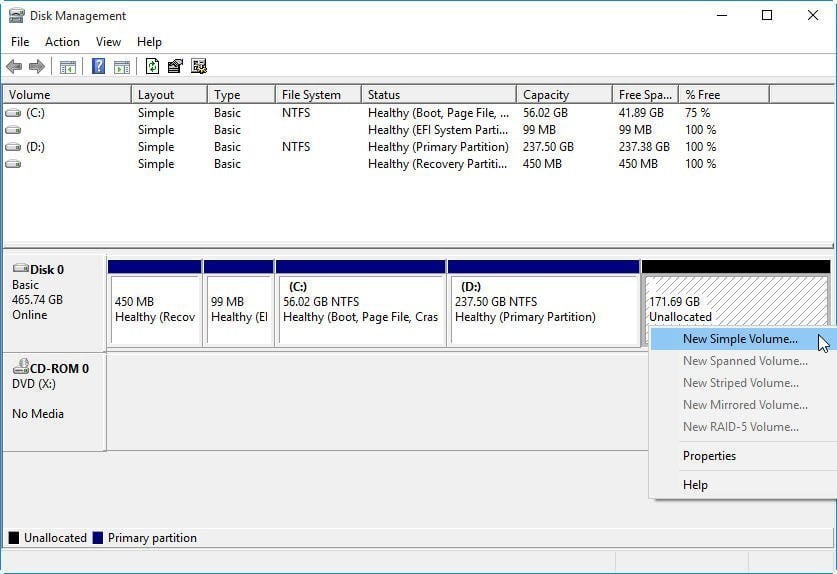
Step 4: After Step 3, you will find a unallocated space behind D drive. Then, right click on it and select "New Simple Volume" and follow the wizard to format and create a new partition.
Notes: The unallocated space created by shrinking a partition can be only used to create new partitions. You cannot use it to extend volume. That's why you may find "Disk Management extend volume greyed out".
Method 2: Partition Hard Drive in Windows 10 with AOMEI Partition Assistant (Recommended)
AOMEI Partition Assistant Standard is a free, complete and easy-to-use partition manager and disk utility to optimize disk space usage, change disk partition type and perform other tasks based on disk partitions. It offers two ways to create a partition. One is to create partition with unallocated space; the other is to create partition without unallocated space. You can choose the way that is suitable for you.
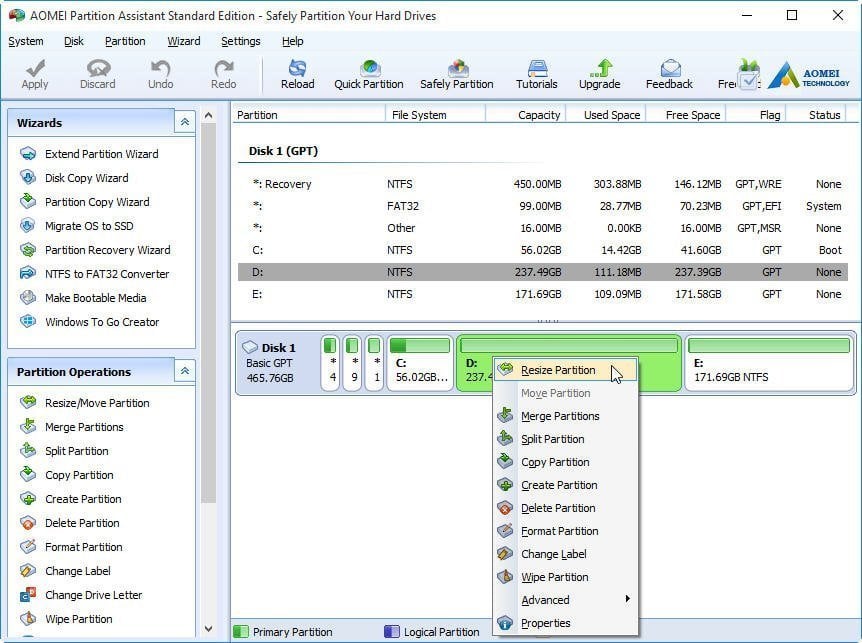
Step1: Download, install and launch AOMEI Partition Assistant. Select the hard drive in your Windows 10 system that you want to partition (here is Disk 1). Right click on a drive (here is D: partition) and then choose "Resize Partition" (If there is an unallocated disk space on hard drive, you can start from Step3).
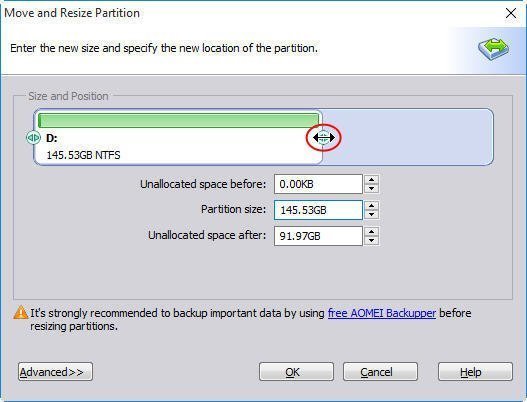
Step2: Drag the slider bar leftwards to decide the size of unallocated space, and then click "OK".
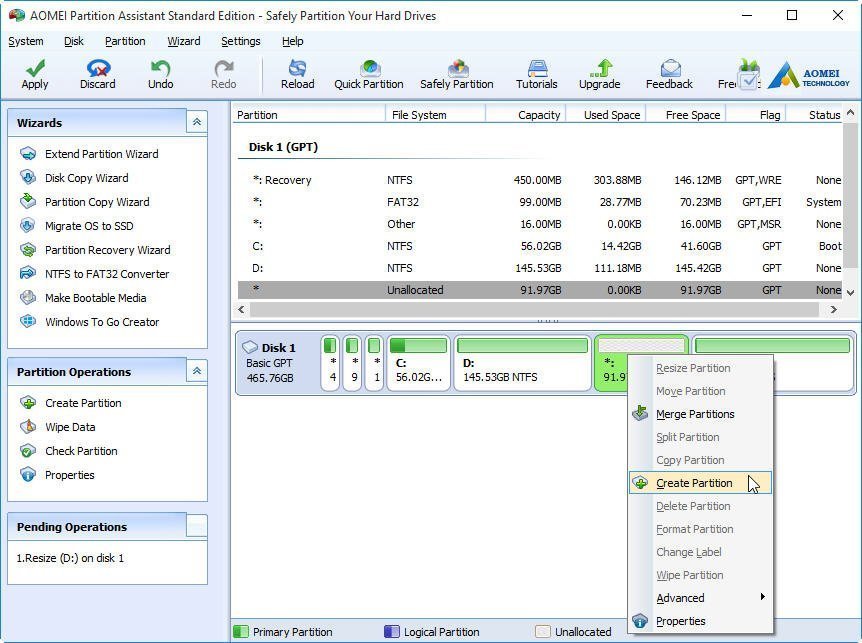
Step3: After Step2, you will see there is an unallocated space behind D partition. Then, right click on the unallocated space and choose "Create Partition".
Step4: You can drag the slider bar to decide the size, change drive letter and file system. Besides, you also can click "Advanced>>" to set other property. Click "OK" to continue.

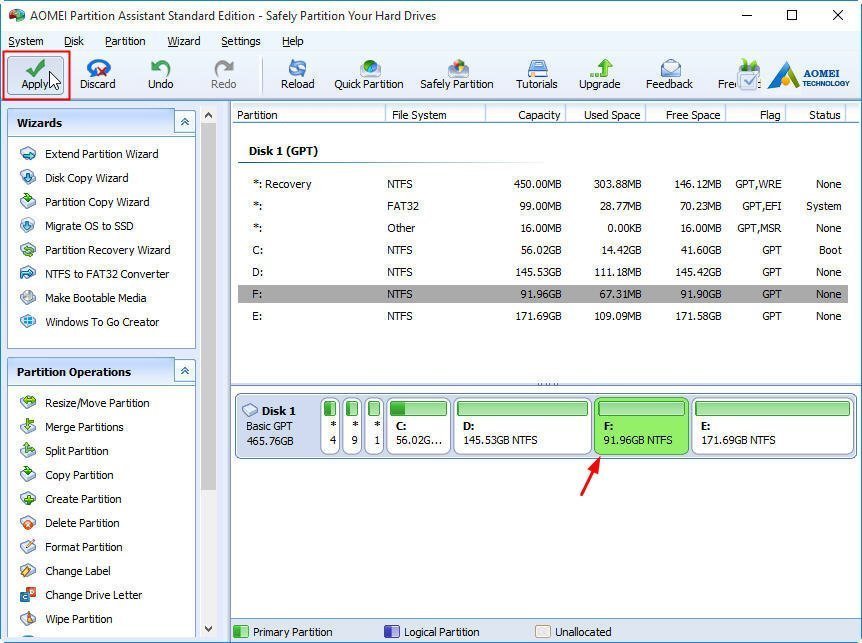
Step5: You will preview there is a new drive (F: partition) on the hard drive. If you want to perform the operation, please click "Apply".
Tips:
It sounds very difficult for users to partition hard drive, but don't worry, Windows 10 Disk Management tool and third-party free partition software like AOMEI Partition Assistant Standard will help you partition hard drive easily and safely.
Before you do
If the hard drive of your Windows 10 is MBR, please make sure how many partitions have been on hard drive? Due to MBR disk only supports maximum 3 primary partitions plus 1 extended partition or 4 primary partitions. If the number of partitions has reached the limitation, please learn how to convert primary partition to logical. However if your disk is GPT, there is no limitation for the number of partitions.
Method 1: Partition Hard Drive in Windows 10 with Disk Management Tool
Disk Management is a tool built in all Windows versions to manage hard disk partitions, such as create, delete and format partitions, change drive letter, shrink volume, extend volume and perform other disk-related tasks.
Step 1: To partition Windows 10 hard drive, let's get started from opening Disk Management Tool in Windows 10. The easiest way is to right click Start Menu and select "Disk Management".
Step 2: Select the hard disk you want to partition. Right click a partition (here is D: drive) and select "Shrink Volume".
Step 3: In the pop-up window, you can modify the amount of space to shrink. And then click "Shrink".
Step 4: After Step 3, you will find a unallocated space behind D drive. Then, right click on it and select "New Simple Volume" and follow the wizard to format and create a new partition.
Notes: The unallocated space created by shrinking a partition can be only used to create new partitions. You cannot use it to extend volume. That's why you may find "Disk Management extend volume greyed out".
Method 2: Partition Hard Drive in Windows 10 with AOMEI Partition Assistant (Recommended)
AOMEI Partition Assistant Standard is a free, complete and easy-to-use partition manager and disk utility to optimize disk space usage, change disk partition type and perform other tasks based on disk partitions. It offers two ways to create a partition. One is to create partition with unallocated space; the other is to create partition without unallocated space. You can choose the way that is suitable for you.
Step1: Download, install and launch AOMEI Partition Assistant. Select the hard drive in your Windows 10 system that you want to partition (here is Disk 1). Right click on a drive (here is D: partition) and then choose "Resize Partition" (If there is an unallocated disk space on hard drive, you can start from Step3).
Step2: Drag the slider bar leftwards to decide the size of unallocated space, and then click "OK".
Step3: After Step2, you will see there is an unallocated space behind D partition. Then, right click on the unallocated space and choose "Create Partition".
Step4: You can drag the slider bar to decide the size, change drive letter and file system. Besides, you also can click "Advanced>>" to set other property. Click "OK" to continue.
Step5: You will preview there is a new drive (F: partition) on the hard drive. If you want to perform the operation, please click "Apply".
- If you don't want to use the whole unallocated space to create new partition, why not add some unallocated space into a partition
- If there is no unallocated space on a hard drive, you also can use split partition to create new partition.
- If you partition on SSD disk, we suggest you to tick "SSD partition alignment" to align the partition(s).
No comments:
Post a Comment