Showing posts with label Beauty. Show all posts

Thursday, May 19, 2016

9 Ways to Prevent Acne

Do you suffer from acne breakouts? If so, you’ve probably spent countless dollars on acne creams and gels that promise to help clear your skin. The bad news is you’re probably wasting your money. The good news is, there are ways to prevent future breakouts that won’t cost you a penny.
Acne breakouts often occur because of changes you’ve made to your daily routine. Maybe you’ve started using a different laundry detergent, shampoo, face cream or soap. These are often the biggest culprits of an acne breakout. If you want to keep your skin clear and radiant, avoid breakouts by following these 9 simple tips:

1.Keep your face clean
 Whether or not you have acne, it's important to wash your face twice daily to remove impurities, dead skin cells, and extra oil from your skin's surface. Washing more often than twice daily is not necessarily better; it may do more harm than good. Use warm, not hot, water and a mild facial cleanser. Using a harsh soap (like deodorant body soap) can hurt the already inflamed skin and cause more irritation.
Avoid scrubbing your skin harshly with a washcloth, an exfoliating glove, or loofah (a coarse-textured sponge). Gently wash it with a washcloth or a very soft cloth. Always rinse well, and then dry your face with a clean towel. (Toss the towel in the laundry hamper, as dirty towels spread bacteria.) Also, use the washcloth only once before washing.

2. Moisturize
  Many acne products contain ingredients that dry the skin, so always use a moisturizer that minimizes dryness and skin peeling. Look for "noncomedogenic" on the label, which means it should not cause acne. There are moisturizers made for oily, dry, or combination skin.

How To Get Rid of Back Acne with 8 Tips

http://honeylove44.blogspot.com/
Bacne, a combination of "back" and "acne," is almost as common as it is annoying. Pre-pubescent teens and adults alike who suffer from bacne understand that it's a whole different can of worms to deal with than pimples that show up on your face. Still, because bacne is caused by overactive sebaceous glands on the back, it shares some treatment similarities with other forms of acne vulgaris.
 1. Wear a clean bra
  If you wear a bra, it is extremely important it should be clean. Try to wear a fresh one each day. Your straps should be tight enough so as they do not rub against the acne when you move, which irritates it. If possible, wear a strapless bra as this reduces redness on your shoulder blades.

2. Wear breathable, clean, loose clothes
 Ensure any material touching your back is clean and, if possible, made of primarily natural fibers such as cotton. Try to avoid tight-fitting clothing. Finally, the clothes should be laundered regularly--preferably after each wearing.
  • Try to wash clothes in a gentle detergent with minimal or no scent. Acne can be caused or worsened by overly harsh or highly perfumed detergents.
  • If possible, bleach your whites. Bleach kills any lingering bacteria on your clothing and impedes acne growth. Be sure to rinse completely to prevent the bleach from irritating your skin chemically.

Friday, May 6, 2016

How to remove chest hair with 10 tips

For Men, there are no wrong reasons if you’re wanting to lose some chest hair. Despite the culture of masculinity you may have been raised in or exist inside these days many men remove or groom their body hair. As many as sixty three.6 % of them do, in fact, and that's a number that has only full-grown in recent years.  Chest hair can be easily and barefacedly removed today, by razor, wax, laser or cream, so get to your grooming.

1.Decide on your look

Shaving is the tried and true method, but there area unit degrees in its severity. You can utilize a trimmer to manage (or even, dare we say, sculpt) your growth, or use a razor and take the whole of it completely off.

   - It’s a common misconception that shaving body hair will create it grow back thicker, coarser, darker, faster, and more plentiful, but this is not the case.  Shaving cuts the hair, resulting in a blunter tip for the hair (which causes it to feel coarser), but this is not permanent and has no lasting effecting on the cyst.

2. Things are getting bushy

Thursday, May 5, 2016

6 Ways to Straighten Your Hair

To take it from a curly-haired girl, straightening thick hair to look "flowy" and light-weight is not as simple as it looks. Those who keep their thick tresses trying stunning and straight should bear a protracted process of drying and styling before it can look the manner it will once they head out the door. Thick hair requires time and patience, especially when your desired look may be a excellent pin-straight do. To top it off, thick hair usually suggests that it's significant, which can overwhelm the design that took forever to realize. In order to traumatize this issue, some have opted to, thin out, their hair and add some layers, making it less significant and easier to work with. However, even with these features, it can still be a troublesome to straighten and style as desired.

In order to seek out the most effective tips for straightening thick hair, I decided to succeed in dead set reach intent on professional Niccola Bowen, a professional hair stylist based mostly in the United Kingdom of Great Britain and Northern Ireland. Having dealt with many varieties of hair (both cutting and styling), she quickly gave me some key points that can slow down on time and leave your hair trying as straight as you had hoped for.

Curls and waves are fun and exciting, but can be hard to keep neat from time to time. So if you square measure in the mood to change up your look, try straightening your hair! many people square measure reluctant to straighten their hair because they are frightened of causing injury, but with the proper instrumentation, products and techniques, you can deliver the goods an incredible straight look without destroying your hair. To straighten your hair, using either straightening irons or a hair appliance, just follow the steps below.

10 Ways to Remove Your Hair Colour

The first issue to think about when trying to get {rid of} or modification your hair colour is what colour do you wish to achieve? do you want it to be a really pale and even base for coloring your hair a pastel colour or you just have to be compelled to get rid of some unwanted red tones before coloring your hair blue. Maybe you need to induce some colour out of your hair before coloring it a a lot of natural shade. Whatever the reason, it’s important to select a method (or techniques) which will work for you.

Below is a list of methods, in no particular order, which you can use to fade or remove colour from your hair. The methods printed work with variable effectiveness and cause differing amounts of injury. Always start with the least-damaging methodology, taking into consideration the effectiveness of the methodology on the sort of dye you’ve used. You should assess the condition of your hair and do strand and sensitivity tests before proceeding with the colour removal techniques below.

1. Bleaching

When you don’t like your hair color it’s tempting to achieve straight for the bleach. Bleach is probably the most powerful colour removal methodology but in many cases it’s unnecessarily harsh.

So when should you use bleach? In my opinion, you should only elect bleach when you’ve tried several different suitable colour removal strategies. You probably understand that bleaching your hair is damaging therefore gratuitous bleaching ought to be avoided. Bleaching already lightened hair risks severe damage therefore it should be your last resort.

Monday, May 2, 2016

6 Tips How to Make Sharp Nose Naturally


How to make sharp nose without surgery is not easy because it takes time and is not a quick process. But it does not mean that you won't have a sharp nose in a natural way, if you focus and routinely perform natural treatments for shaping nose for sure the results will be good. The type of treatment is not the same as the way to overcome oily skin, because this process doesn't use some sort of mask or other cream.
http://honeylove44.blogspot.com/
Sharp Nose has a special attraction in the eyes of everyone, without exception men and women Because having beautiful shape nose can make you look more perfect. If since you were born with a pug nose, actually you can change your pug sharp nose.
Don't be tempted when hear the word 'fast' because of all the things  are wanted definitely takes the process and patience, so natural tips for following shaping nose really requires substantial time, but as time goes by and you routinely perform recommended maintenance to make the nose look sharp, possible positive result, which is a more pointy nose.
Although these tips need long time, but still tend to be safe without any harmful side effects because of the following methods shaping nose not wearing chemicals or creamy various beauty products.
1. Start by pinching  the nose using a 'thumb' and 'finger' slowly, then lifted slightly upward. Do this treatment approximately 4-5 minutes each day that increasingly sharp nose by itself. This method is also suitable for large hollow sharp nose.

How to Have a Smooth Face With 7 Tips

At birth, our skin, especially that on our face is smooth, soft and flawless just like silk but over the years this changes. Many factors such as poor diet, stress, summer heat, cold winter air, cosmetics, environmental pollutants and many others start to make our skin rough. If you, like many people, suffer from this rough skin, you are in luck because there are several simple things you can do to help regain the smooth skin on your face.

http://honeylove44.blogspot.com/

1. Apply Lemon, Honey and Olive Oil Face Mask

Honey works as both a skin cleanser and an anti-inflammatory because it fights damage to your skin and its antioxidants reduce any signs of aging. The lemon has plenty of vitamin C as well as other nutrients that can help skin problems in addition to giving a glow, reducing dark spots and lightening your skin. Women in ancient times used olive oil to help get beautiful skin as this ingredient can give a glow and help with elasticity.
To make the facemask take equal amounts of the olive oil, honey and lemon and then apply it with a cotton ball. Leave it on for 20 minutes then rinse it off with lukewarm water or leave it on overnight rinsing it off in the morning.

12 Ways to Get Longer Hair Fast


http://honeylove44.blogspot.com/
One day I saw a bob hairstyle in a magazine and decided to go for it! So, I got rid of my long and shiny, at the time, locks and was happy with my new, easily manageable and cute bob hairstyle. But, as the time went by, I started to miss my long, gorgeous hair, just as it happens to most girls, who cut their long strands, carried away by the fleeting impulse of enthusiasm. So, I started to look for answers to the question that many ladies ask: ‘How to make your hair grow faster?’ If you are in similar situation, or you just wonder what makes hair grow faster, let me share with you some tips.
The rate at which your hair grows is genetic and it normally grows at around a quarter to a half an inch every month. You can, however, do things to increase the growth rate of your hair and improve on the thickness and the healthiness of your locks. If you want long and luscious locks of hair, then read these ten tips on how to make your hair grow longer, faster and more beautiful:
1) As your hair grows, it is important to keep it in good condition, so you will be trimming your locks off again to get rid of split ends. Using a hair masks is a great way to keep your hair looking wonderful and here is extremely great and efficient hair mask, that will not only help your hair grow faster, but also will make your locks look shinier, healthier and even more beautiful: mix in a small bowl – one yolk of an egg with a tablespoon of honey, one tablespoon of extra virgin olive oil (or linen oil) and a tablespoon of Vodka (or Cognac). Massage this mixture into the roots of your hair and then, spread to the lengths; wait for about thirty minutes. For better results you can put a shower cup on your head and cover it up with a towel, but make sure that your special someone doesn’t see you wearing this extravagant construction on your head, as this might not look very seductive. After the thirty minutes, wash and condition your hair, as usual. You will be astonished with amazing results, especially, if you do this mask regularly, once a week or once every two weeks, during one month or two.


Sunday, May 1, 2016

13 ways to get pink lips naturally


http://honeylove44.blogspot.com/
It is just in order to easily improve your beauty by creating an attractive smile as well as one of the best ways to perform this is with pink lips. Indeed, a lot of people usually are not fortunate enough to have naturally pink lips in lieu of having lips that are pale as well as dark which is not attractive.
Moreover, dark lips can take place because of various reasons including humid temperatures, contact to direct rays of the sun, low blood circulation, stress, failing to eliminate lipstick, using inferior low standard, smoking habits, applying enough chemotherapy, fluoride, chewing tobacco, illness, ignoring weather, for you health, an excited lifestyle as well as others.

Here are 13 ways to get pink lips naturally:

1. Moisturize Your Lips

The fact that the skin of your lips has a small quantity of sebum (an oil), you have to keep your lips moisturized provided you desire them to remain healthy and hence pink. Moreover, it significantly important to note that if you are going outside, attempt applying a bit of petroleum jelly or else lip balm as well if you are inside, use some cocoa butter. On the other hand, if you desire your lips to be soft as well as pink, you have to keep them moisturized.


2. Use Pomegranate Seeds and Milk

You should bear in mind that another simple procedure towards lightening shady, tedious lips as well as make a good-looking pink color is by means of having used pomegranate seeds.  You can mash up the seeds and amalgamate it with a little quantity of milk cream. If you use this home remedy to your lips on a regular basis, you will definitely start to watch them becoming redder as well as fuller. Don’t forget the great thing about this remedy is that there are of course no side effects.

3. Apply Cucumber Juice

Another important way to lessen any darkness on your lips is to apply a bit of cucumber juice. Just slice a cucumber, rubbing it against your lips to permit the juices to soak on. Note that if you do this for five minutes on a regular basis, you can lighten dark lips to a beautiful pink color.

4. Mix Rose Petals in Milk

Rose petals are another one of the wonderful home remedies for pink lips. You can just soak a few rose petals in milk for a short time. What should you do next? After that make use of the petals towards making a paste, adjoining a few drops of glycerin and honey. Dab the paste on your lips as well then wait just fifteen minutes before smoothly massaging it off applying milk. This remedy can bring about wonderful results.

5. Massage with Lemon Juice

Another remedy just needs lemon as well as some sugar. In order to do that cut a thin slice from the lemon, sprinkling a bit of sugar on top and rub your lips with this combination on a regular basis. This works miraculously since the lemon function for naturally bleaching your lips, coming again to their light as well as pink color whilst sugar works to exfoliate lifeless skin cells.

6. Apply Berry Mixture

Berries for example raspberries as well as strawberries have a lot of benefits that are immense for solving the problem related to dark lips. In that situation what can do is that you required making a paste using raspberries as well as mixing it with a little aloe vera juice and pure honey. After using this homemade paste, leave it on for just five minutes before rinsing it off as well as replacing it with a lip balm that is homemade. This is effectual because raspberries have a lot of vital vitamins and minerals that can keep your lips healthy and thus lively.

7. Mix Turmeric Powder with Milk

Moreover, one of the best ways towards lightening shady lips came through India. The fact that they amalgamate unprocessed turmeric powder as well as milk cream towards achieving wonderful results. On the other hand, you would also make an effort try amalgamating turmeric powder as well as gram’s flour in order to light your lips. Simply you have to bear in mind that flour of the gram’s dries up lips making it an ordinary choice for those whose lips are previously dry. Just know that if you, however apply this mix-up, you should be confirming towards using a profound twofold cream designed in moisturizing your lips after you eliminate the mix-up.

8. Mix Honey, Almond Oil, and Sugar

Now another perfect remedy is to amalgamate sugar, honey, as well as some amount of olive or almond oil. Use this to your lips, massaging it in for ten minutes.

9. Scrub with Toothbrush

Furthermore, if you desire smooth lips, you can use your toothbrush each night after brushing your teeth. You just scrub the lips with it (make sure it is soft bristled) as well as this can eliminate the chapped, dry skin that forms around your lips, making them look fresher.

10. Remove Makeup before Sleeping

Finally, one of the most common reasons people have tedious lips is because of the fact that they do not take off their makeup. That is the reason why you should not forget to remove it before going to bed. Simply put a bit of olive oil or almond oil on a cotton ball as well as rub your lips with it gently. Thus, we have learned how to get pink lips.

11. Exfoliate with a toothbrush

  One of the best ways to get naturally pink lips is to regularly exfoliate your lips with a toothbrush.
  • All you need to do is dampen a soft-bristled toothbrush and gently rub your lips using small circular motions.
  • This sloughs off dead skin and stimulates blood flow to the lips, making them soft and pink.

12. Make a lip scrub

  An alternative method of exfoliating your lips is to use a homemade sugar scrub.
  • Simply combine two tablespoons of coarse white or brown sugar with one teaspoon of honey and one tablespoon of organic coconut oil.
  • Apply a little of this to the lips and gently rub in for 30 seconds to a minute before rinsing with warm water.

13. Completely remove make-up at night

  Leaving lip make-up on overnight can cause lips to become dried out and even discolored.
  • Make sure to remove lipstick and lip liner with an effective make-up remover or cleanser before bed. No excuses.
  • If you run out of make-up remover, a little olive or almond oil on a cotton ball will effectively remove any lipstick or liner.


Saturday, April 30, 2016

8 Ways to Make Eyebrows Look Beautiful

Your brows frame your face and give it structure, so it's important to keep your t
iny arches on point at all times. Worried yours are a little wonky? Cosmopolitan.com asked makeup artist and brow wiz Cyndle Komarovski what makes your arches look off and how to make them pretty, pronto. You're welcome.

http://honeylove44.blogspot.com/
1. You're squaring off the front of your brows. Doing this too harshly can immediately make them look drawn on (aka fake). Instead, create shape by using tiny, hair-like strokes, regardless of whether you use a pencil, an angled brush topped with brow powder, or a brow mascara.


2. Your eyebrow's tail is too long

 Overextending the tail of your brows can create a droopy effect, drawing your face down. Your eyebrows naturally stop at a place that lifts your face up and out, which is what you want to maintain. To figure out where the tail of your brow needs to end, hold a brow pencil diagonally at your nostril and line it up with the side of your eye. Where the pencil hits your brow bone is where the end of your eyebrow should end (or can be extended to) without it looking unnatural.

http://honeylove44.blogspot.com/
3. You're exaggerating your eyebrow's arch

 Pointy arches can make you look surprised or angry even when you're not. So, if you weren't born with a high arch but want to create a subtle one, hold a brow pencil against your nostril and line it up diagonally with the center of your eye. That's exactly where any arch should go naturally.
Next, with a spoolie brush, like E.L.F. Cosmetics Essential Eyelash and Brow Wand, work your eyebrow hairs downward. With your brow product of choice (a pencil and a light touch might be your best bet!), ever so slightly alter your brow shape by creating a slight peak at the roots of the hairs at the top of your brows. Finally, brush your brow hairs back up with the spoolie brush so they fall into place and the arch looks natural.


4. You aren't shaping your brows

 Unruly brows are one thing (They're actually in right now!), but unshaped brows don't frame your face as well as well-groomed brows could. Don't have time to see a brow expert? Simply follow the shape of your brow (where the most hair is) and tweeze any strays that fall outside of that shape for perfect arches.


5. You have bald brow spots

 If you've fallen victim to over-plucking in the past, you're not alone. To conceal sparseness, fill in the spots with brow powder using an angled brush or you can opt for a pencil. Then, groom your brows into place with a brow mascara, like Maybelline New York Eye Studio Brow Drama Sculpting Brow Mascara.


6. You're using too much highlighter. Outlining your brows with a highlighter can put too much of a spotlight on your arches. Instead, opt for a concealer that's one shade lighter than your skin to brighten up your brow area. Try NudeStix Concealer Pencil.


7. You're over-filling your brows

  This can make you look like Groucho Marx's twin. The key to making your brows look darker but natural is not getting the formula you're using on your skin. If you have a bald spot you're trying to fill in, that's one thing, but if you're just trying to deepen your brow hair color, your best bet is a brow mascara that you can lightly swipe on for a more dramatic yet believable effect. Try L'Oréal Paris Brow Stylist Plumper Brow Gel Mascara.


8. You're doing a patchy job of filling in your brows

 If you feel like you only need to amp your arches up at the beginning of your brow, you still need to brush or apply whichever brow product you're using through to the ends. You can taper the amount off toward the tail so it's not as intense, but if you don't apply it to your entire brow, you'll end up with an uneven look, which no one wants.


How to Get Rid of Acne Naturally At Home

Acne and pimples are two of life’s most annoying and prevalent skin curses. Most of us have been in a situation where an ugly red spot has appeared the day before an important event or date. The question is: can you do anything about it without having to indulge in expensive medication? The answer is yes! Try some of these simple and natural home remedies to fight off those pesky pimples.

1. Aspirin

Aspirin is an anti-inflammatory so it can be a quick and cheap way to help reduce a pimple. The other plus is that most of us always have aspirin lying around at home. The simplest way to use it is to make a paste with 3 parts water to 1 part aspirin. Once the mixture had thickened take a Q-tip and apply to the aggravated area. The paste will take roughly half an hour to harden and begin to flake off, which will be your cue to wipe the paste off with a west tissue or face cloth.

2. Take a dip

If you have a pool readily available, try going for a swim. Chlorine is known to dry out your skin, which is good news for getting rid of pimples. Just be sure to properly moisturize the rest of your skin and condition your hair to prevent damage.

3. Aloe Vera

This bad boy is a triple threat. Not only does it cool your skin down, which feels great, it reduces the inflammation and redness of pimples as well as removes the oiliness from your skin.

4. Toothpaste

Toothpaste is a good option if you have a mammoth pimple that you want to take care of quickly. It is effective because it contains silica, which is the same substance that can be found in bags of beef jerky to keep moisture out. As such, toothpaste has been know to dry out and reduce the size of pimples over night. Simply apply some to the affected area before sleep and wash it off in the morning.

5. Honey

Honey honey, how you thrill me, ah-hah, honey honey.
In addition to being delicious, honey is a natural antibiotic which makes it perfect for healing and reducing pimples. As an added bonus its stickiness helps to remove excess dirt and impurities from your skin. You can utilize honey by making a simple mask. To do this, mix two tablespoons of the golden elixir with a teaspoon of cinnamon and apply it to your face. Yes, it may get messy. Allow the mixture to set for roughly ten minutes before rinsing it off with warm water.

6. Garlic

I’m one of those crazy people who grows her own garlic, so you don’t need to give me an excuse to use it even more than usual.
Garlic is fantastic for fighting acne due to its high levels of antioxidants, as well as its’ anti-bacterial, anti-fungal, and anti-viral properties. There are two ways you can use garlic to clear up acne. The first is a preventative measure, which is simply by adding more garlic to your diet. This helps your general health as well as purifies your blood, which can help to stop future break outs. For more immediate results, take a peeled clove of garlic and rub it on the troubled area several times a day. If your skin is sensitive, try crushing the garlic and mixing it with some water.

7. Steam

No, not the software. Although I do recommend that also.
Steam can be helpful for treating acne because it helps to open up your pores, which prevents them from being clogged. Steam also moisturizes and detoxifies your skin.

8. Tea Tree Oil

Tea tree oil is renowned for being good for your skin. In addition to this, it also contains anti-bacterial and anti-fungal properties, which makes it highly beneficial for acne treatment. In fact, studies that compare tea tree oil to the acne medication benzoyl peroxide shows it to be just as effective. Simply apply the oil to the pimple or affected area with a cotton wool ball or Q-tip.

9. Cucumber

Cucumber works as an anti-inflammatory, which is why people use cucumber slices to combat puffy eyes! They work just as well for pimples and will help to reduce the angry redness of them. You can make a paste by by combining finely grated cucumber with two to three teaspoons of lemon juice and applying it to your skin. Leave for ten to fifteen minutes before washing off.

10. No Popping!

I’ll admit that I’m guilty of popping a pimple or ten in my time, but you need to try and fight the urge! As tempting and gratifying as it may be at the time, it’s the worst possible thing you could do. Firstly, it further inflames the area which means that it can result in scarring. Secondly, popping causes the bacteria living in the pimple to spread to other pores, thus infecting them too. Ironically, this can easily result in even more pimples. Just don’t do it!

11. Ready your face for steam cleaning

  If your hair falls into your face, pull it back and secure it with a hair tie, head band, or bobby pins. Wash your face with a gentle cleanser, either a non-oil-based product or a plant-oil-based product. Many dermatologists recommend using glycerin, grapeseed and sunflower oils, as oils are best to absorb and dissolve other oils.
  • Use your fingertips instead of a washcloth or sponge that could further aggravate your skin.
  • Massage the cleanser into your skin for about a minute using a gentle, circular motion. You're not trying to scrub, just help the cleanser loosen and absorb dirt and oils.
  • Rinse your face thoroughly with lukewarm water.
  • Pat your skin dry using a clean, cotton towel. Never rub a towel over your face, as this could further irritate your skin.

12. Choose your essential oils

  The oils listed here all have either antibacterial or antiseptic properties, meaning they can kill the bacteria that cause acne and prevent the formation of new pimples. You can choose based on personal preference (which one smells best?) or based on your unique situation. If you tend to be anxious or depressed, use the lavender. If you have some pimples (usually bacterial), in addition to blackheads, use an herb with antibacterial properties. If you are battling an upper respiratory infection, use thyme to both treat the infection and break up the congestion with heat.
  • Spearmint or peppermint oils may be irritating to some, so pre-test your skin by putting a single drop of it on your wrist and waiting for 10-15 minutes. If there is no irritation, you should be able to use the oil. Start with 1 drop per quart of water. Both peppermint and spearmint contain menthol, which has both antiseptic and immune-boosting properties.
  • Thyme boosts the immune system and has antibacterial properties. It also increases circulation of the blood by opening up blood vessels.
  • Calendula accelerates healing and has antimicrobial properties.
  • Lavender is soothing and can help with anxiety and depression. It also has antibacterial properties.

13. Prepare your steaming water

 Fill a 1-quart pot with water and bring it to a boil for a minute or two. Once the water has been steaming for a couple minutes, add 1-2 drops of any of the listed essential oils.
  • If you don’t have the essential oils, substitute with ½ teaspoon of the dried herb per quart of water.
  • Once you have added the herbs or oils, let the water boil for another minute.
  • After a minute, turn off the heat and move the pot to a comfortable area for steaming. Make sure you won’t have to hunch awkwardly over the pot, as you’ll have to hold that position for a while.

 14. Test for skin sensitivity

  Always be aware that you can develop sensitivity to an herbal oil. Even if you've successfully used oil in the past, retest it every time you steam your face with it. Try each oil for about a minute, then take your face away from the steam for 10 minutes. If you're not sneezing and you're skin isn't reacting poorly, reheat the water and proceed with the steaming.

12 tips for naturally beautiful nails

You don’t have to visit the salon on a regular basis in order to have beautiful nails. The combination of a well-balanced diet, a thoughtful beauty regimen, and good personal hygiene can give you salon-worthy nails at a fraction of the cost and chemical burden.
http://honeylove44.blogspot.com/

1. Use moisturizer

When rubbing lotion or oil into your hands, make sure you work it into the cuticles and nails, too. Regular handwashing or use of hand sanitizer can dry out the skin and nail bed quickly, so try to moisturize after every wash, if possible. Coconut oil is excellent for rubbing into your nails and cuticles.

2. Care for your cuticles

Avoid having your cuticles trimmed during a manicure. Cuticles are meant to be a barrier for bacteria, and cutting them can lead to painful infections. You can moisten and push them back with a cuticle pusher, and trim away only dead pieces of skin.If you’re planning on having a conventional manicure done, then at least protect your cuticles by dabbing with olive oil or almond oil prior, in order to reduce the amount of chemical that soaks in from the polish.

3. Avoid using harsh polish

Nail polish typically contains very toxic chemicals such as toluene, dibutyl phthalate, dimethyl and diethyl phthalates, camphor, and formaldehyde. Fortunately, companies such as OPI, Orly, Sally Hansen, and Revlon make some polishes that do not contain these chemicals, but make sure you read the label carefully before purchasing. You can also buy water-based polishes, which don't last as long but are the safest option out there.

4. Seek out alternatives

There are companies now making less toxic polishes and removers. Check out the following list and take your favorite color along when you go to the salon for your next pedicure.Suncoat
Scotch Naturals
Acquarella
SpaRitual
Deborah Lippman
Priti
No-Miss Nail Care

5. Buff instead of color

It may not be as fancy or eye-catching as color, but a bit of buffing can go a long ways. Take the time to trim, file, and buff your nails properly and you’ll be pleasantly surprised at how great they can look, despite being au naturel. Never saw back and forth with a file because that can weaken your nails. Always file from the outside edge of the nail inward.

6. Choose a good remover

You can get acetone-free remover almost anywhere, which is less harsh on your nails. Priti sells a remover made entirely from soy and corn, and No-Miss has one called Almost Natural that contains fruit acids and vanilla.

7. Eat well

Diet is very important to maintaining healthy nails. Protein is crucial, as are omega-3 fatty acids. Eating foods with vitamin B reduces brittleness; zinc gets rid of white spots; iron prevents ridges from forming; calcium keeps them strong; vitamins A and C prevents dullness and drying. Drink plenty of water to stay hydrated.

 8. Gather supplies

  You'll need a few tools in order to make your nails look healthy and beautiful. You might have to spend a little money to accumulate everything you need, but over time doing your own nails is much less expensive than getting manicures. Here's what you need:
  • Nail trimmers
  • Nail file
  • Polish remover
  • Cotton balls
  • Buffer
  • Cuticle cream
  • Hand lotion
  • Orange stick

9. Soak your nails in a bowl of warm water

  Soaking your nails softens them and makes them easier to trim. It also makes your cuticles more supple and easier to push back. Soak for about five minutes, until your nails are pliable, then dry them on a towel. 
 

10. Trim and file your nails

 Use nail trimmers to create the nail shape you want, either squared off or rounded. Don't trim too short; you want to leave a white crescent on each nail. This extra length protects your nail beds and looks pretty, too. Use a nail file to neaten the edges and smooth out the shape of your nails.
  • When you're using a nail file, move it in one direction across the tip of your nail. Don't scrape it back and forth, since this damages your nail fibers.
  • Avoid using a file to make your nails shorter; always start with a nail trimmer, then use the file just for shaping purposes.
  • Do not round the corners down into the sides of the nail bed, because this can cause ingrown nails, especially on the big toes.

11. Push back your cuticles

  Dry your nails and apply a cuticle cream. Let the cream soak in for about three minutes, then use an orange stick (or cuticle pusher) to gently push back the cuticles, the skin growing at the base of your nail. This makes the shape of your nails prettier and prepares them for an even coat of polish. Wipe off the cuticle cream when you're finished.
  • Never force your cuticles back, and never trim them. Cuticles are there to prevent infection, and cutting them will leave your fingers prone to getting red and sore.
  • If you don't have an orange stick, try using a binder clip or another item with a flat edge. Just make sure not to use anything sharp.

12.Buff your nails

  Use the rough side of your nail buffer to buff your nails, gently running it across the surface of your nails in one direction. Next switch to the medium-grade side and repeat the process. Finish buffing with the smoothest, finest side to add sheen to your nails. Don't grind down the surface of your nails too much. You don't want to thin out your nails. The goal with buffing is just to create a smooth, shiny surface.


How To Grow Thicker and Longer Eyelashes

What is the most striking part of your eye? Undoubtedly your eye lashes. No matter what is your eye shape and colour, long and full lashes add an quality of mystery that make your eyes so very attractive. To give our eyelashes that dramatic look, we either use mascara or fake eyelashes. But for how long ladies? Why don’t we venture into some natural ways and solutions to grow long eyelashes?

http://honeylove44.blogspot.com/

Eyelashes Care is Equally Important as Hair Care

We care for our hair, so why not our eye lashes too? As routine hair care makes them healthier, taking care of our lashes will show positive results over the course of time. It is easy and you don’t even need to work so much as you do for hair. Whenever, you are trying to embark on a lash care routine, remember that the results will not be visible till the next cycle of the eyelashes. So, you will have to wait patiently for two months before you see any difference in your eye lashes.

1. Remove Eye Makeup at the End of the Day

Makeup clogs the skin around the eyes which is very thin already. And mascara is very heavy for the lashes on the lashes. And removing it at night gives a rest to your lashes. The same rule applies here to your eye lashes as your skin as they are both equally delicate.
Also, be very gentle when you are removing your eye makeup. If you are rough with your lashes, they can become sparse and may not grow back as healthy as they are right now. Your eye lashes take longer to grow back than your hair and you don’t want to damage what you currently have.

2. Olive Oil

Apply olive oil to your lashes. This will help them grow longer and stronger. This is one of the best home remedies to get long eyelashes.
Olive oil is a well-known natural remedy for thicker hair growth as well as eyelashes. This oil is rich in vitamin E and oleic acid that nourish and add volume to your eyelashes. It also helps keep the lashes dark.
  1. Dip a clean, old mascara stick or simply a cotton swab in warm olive oil.
  2. Before going to bed, apply the oil carefully on your lashes, just as you would apply mascara.
  3. Leave it on overnight, then wash it off with lukewarm water in the morning.
  4. Repeat this remedy daily for a few months until you get the desired result.

3. Petroleum Jelly

Pure petroleum jelly (Vaseline) if applied to your lashes regularly at night helps your lashes grow faster and makes them thicker and stronger.

4. Green Tea

Add Green tea leaves to warm water and then apply it to your eye lashes. This promotes healthy lash growth and makes them longer, thicker and stronger.

5. Lemon peels soaked in olive or castor oil

  • Soak lemon peels for a few days in olive oil or castor oil
  • Apply this to your lashes for growth.

 6. Diet

Along with home remedies for long lashes, you must have a balanced diet. A few foods that are great to boost the health of your eyes and eye lashes are:
  • Apples
  • Guavas
  • Most fruits
  • Green vegetables.
  • Eggs
  • Meat
  • Fish
  • Other sources of proteins.

7. Brush Your Eyelashes

Brushing your lashes can also help them grow. It will help get rid of dust and dirt particles to prevent clogged pores. Moreover, it will encourage blood circulation so that more nutrients reach the hair follicles.
  1. Put a few drops of vitamin E oil or petroleum jelly on a soft-bristled eyelash brush or comb.
  2. Use the brush to apply the oil or jelly directly on your lashes.
  3. Continue brushing the lashes gently using upward strokes. Start from the root of the lashes and slowly move upward to the tip.
  4. Brush for about 5 minutes twice daily until you see desired results.

8. Eyelid Massage

Massaging your eyelids promotes the growth of your eyelashes. It improves blood flow to the hair follicles, which means more nutrients reach the follicles. This stimulates hair growth and prevents thinning and breakage of your lashes.
  1. Put a few drops of oil, petroleum jelly or shea butter on your eyelids.
  2. Using your fingertips, massage along your lids and lash line in small, circular motions.
  3. Massage for 5 to 7 minutes twice daily for a few months.

9. Lemon Peels

lemon peel
You can also use lemon peels to add volume to your eyelashes. The peels are rich in vitamins C and B, folic acid and other nutrients that promote the growth of eyelashes. Also, when infused in olive or castor oil, they will help enhance the cleansing and stimulating properties of the oil.
  1. Put 1 tablespoon of moderately dried lemon peels in a container.
  2. Pour enough olive or castor oil into the container, so that the peels get soaked.
  3. Allow it to sit for a couple of weeks.
  4. Using an old mascara stick, apply the oil on your eyelashes before going to bed.
  5. Leave it on overnight, then wash it off with warm water in the morning.
  6. Follow this remedy for a few months to get encouraging results.


10 TIPS TO BE BEAUTIFUL WITHOUT MAKEUP

Many of us can’t even imagine our life without makeup. Today’s topic might sound strange and even scary for many girls, thanks to media popularization of unrealistic beauty standards. To be beautiful without makeup?! Is it even possible?!
It became our daily ritual to wake up early and put on our “beautiful” makeup mask.
For many of us it would be a big nonsense even to go to a supermarket with no makeup on.
Media often forces us to believe that a woman with no makeup on can’t actually look somewhat attractive or beautiful.
In this article, we don’t suggest that you completely let go and forget about taking care of yourself; on the contrary, if you want to live a makeup-free life, or at least to be able to have makeup-free days, then it makes sense to put a little bit more effort into caring about the natural beauty of your face, hair and body.

http://honeylove44.blogspot.com/
1) Feel beautiful (even without makeup)
 
Yes, first step to natural, makeup-free beauty is connected with your inner perception of yourself – your self image. How do you feel about yourself inside? It all depends on you. Try to feel beautiful. Yes. Right now, in this very moment…Know that you are pretty!
If a girl considers herself beautiful and is able to accept herself totally and unconditionally, then the the whole world will feel the same about her. Yes, it’s that simple!
But if you don’t feel comfortable and confident about yourself with no makeup on, try to adapt the new ‘natural’ image gradually. For example, while on vacation, give your face a “vacation” as well, by using a minimal amount of cosmetics; use only mascara and a touch of lipgloss.

2) Your skin is your everything!
 
If you decide to lead a makeup-free life, it doesn’t mean that you need to completely let go of all skin care products.
Nobody abolished daily cleansing and moisturizing; these are necessary ingredients to the beauty and health of our skin.
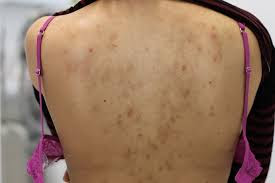
If you used to deal with pimples by covering them up with tones of makeup – now, your main concern is the health and beauty of your skin.
Many skin problems are actually related to the excessive use of makeup; skin tone becomes uneven because of the reaction of your body on a foundation, concealer or blush. If you stop using foundation (at least for a while), after some time, you’ll notice that your skin tone will improve and there will be no need of that thick makeup mask any more. If skin problems persist, get a professional advice of a dermatologist; it’s better to treat the problem straight away, than to put it on hold into a waiting box.

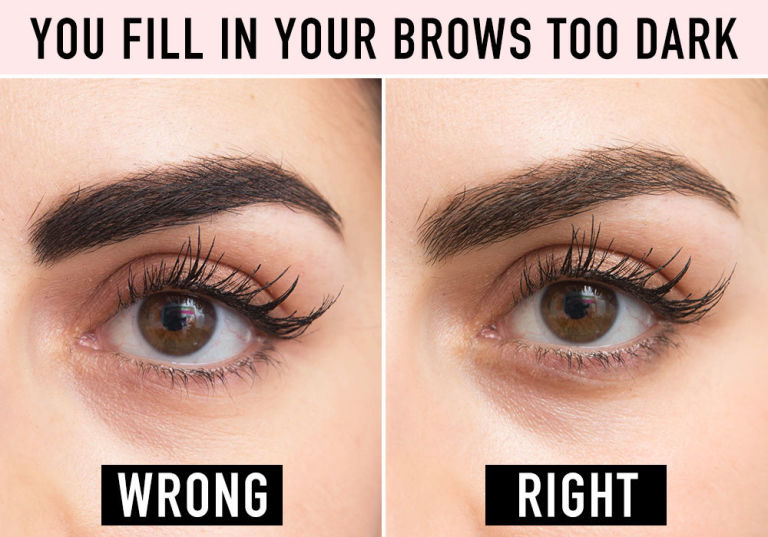
3) Your beautiful natural eyebrows

Usually, when we apply makeup, we often try to change the proportions of our face and adapt it to world’s beauty standards, so that sometimes, we even forget how pretty and unique we look naturally.
If you want to minimize your daily makeup routine, then try to emphasize your natural features. Let’s start with your beautiful eyebrows. Look in the mirror and notice natural shape of your eyebrows, if you over-plucked them, then try to grow them back (apply natural oils on your eyebrows every evening; use castor oil, olive oil, coconut oil or burdock root oil) and then, shape your brows once and for all with the help of a professional, or with the help of YouTube.

4) Be transparent

When we are talking about beauty without makeup, it doesn’t mean that we should completely ignore all the beauty industry and forget about all cosmetic products. There are some great products on the market that can help you emphasize your natural beauty, such as eyebrow gels and transparent mascaras for your eyelashes, chap sticks, lip balms and lip glosses with no or a little bit of color; these nourish your lips and make you look fresh, natural and beautiful.

5) Kissable Lips

Here is a very simple tip on how to make your lips kissable and soft: gently massage your lips every evening (or every other evening) with your toothbrush for a couple of minutes (or use a ‘sugar+honey’ scab instead); then rinse and apply Shea butter (your natural moisturizer) on your lips. Now, feel how tender, soft and kissable your lips feel; your prince charming won’t be able to stop kissing you.

6) Smile and love yourself
 
Smile will instantly help you to feel and look pretty, even if you don’t have any makeup on!
As Audrey Hepburn once said: “The prettiest girl is the happiest one!” Smile every time you look in the mirror, smile to people you see on the street and, in general, let smile be your favorite accessory – you will see how the whole world will start smiling back at you!
Love yourself. Accept yourself fully and completely. Love the way you look with or without makeup, because you are truly unique and beautiful! Remember it!

7) Get plenty of sleep

  It is very important for your overall health to get at least eight to nine hours of sleep every night. A lack of adequate sleep will translate through your face with dull skin and dark circles under your eyes. Also, once you miss a night of sleep, you cannot make it up later by over sleeping because the damage is already done. In order to keep your skin looking fresh and bright, create a regular bedtime schedule.
  • Plan your sleep schedule accordingly so you can fit in the recommended amount of sleep every night.
8) Eat the proper foods your skin needs to thrive
 
  By following the FDA regulated food pyramid, you are setting yourself up for a healthy inside as well as a healthy, glowing outside. What you decide to put into your body reflects on the outside through your skin and face. Our skin gets its nourishment from the vitamins and minerals in the foods we eat so be sure to eat fruits, vegetables, grains, and proteins, which are especially essential to our skin because it is what our skin is made up of.
  • Proper nutrition will help your skin steer clear of acne and pimples, whereas too much sugar can cause your skin to breakout.
9) Reflect beauty from within with a smile
 
 A smile is one of the best ways to achieve a pretty face. The first thing people see is your face and the first thing they notice is your expression. Let everyone see your inner beauty by wearing a smile on your face as much as possible and laughing often.
  • When you greet someone or are having a conversation, flash them a smile to show them you are confident and happy.
  • Happiness radiates, and often a person's personality will come through as physical attractiveness to others.

10) Keep your skin clean 

  When your skin isn't properly washed, it becomes clogged, patchy and develops dark spots. Always remove blackheads, dirt, and oil to maintain clean skin. Your skin is the foundation of a pretty face, so it is important to take great care of it.
  • Use a cream cleanser that suits your skin type and is for daily use. Get in the habit of washing your face every morning and every night.


Thursday, April 28, 2016

5 Ways to Reduce Face Fat

Maybe you don’t want such a full face or feel you’ve got chubby cheeks. You should always embrace the looks you were born with because confidence is the best attractiveness boost. That being said, there are ways you can naturally make your face look slimmer.

1.Get rid of overall body fat

  If you want your face to look less fat, you need to lose fat overall. Spot reduction of fat is not possible to accomplish with diet alone. Eat fewer calories throughout the day, so that your body will use up fat as stored energy. If you do that, you will lose weight in the face too.
  • Luckily, if you want a slimmer face, your body goes after the fat first in the neck, jaw and face. So if you cut down on calories but do it in a healthy manner, you should have a less full face in no time.
  • You need to create a caloric deficit. It takes about 3,500 calories burned to lose a single pound. You will burn some calories every day just by living and breathing. You need to burn more than you take in to lose weight. Effective weight loss occurs gradually.
  • Cutting calories in a healthy manner means eliminating some calories  say 500 a day, through diet or exercise – without completely depriving your body of food. Instead, make healthier food choices or start slow, say by eliminating that morning doughnut from your diet. Not eating at all is medically unsafe. It also could put your body in starvation mode, which will actually reduce your metabolism and make it harder to lose weight.

2. Drink a lot of water to keep the body fully hydrated 

There are many reasons that it’s a good idea to drink a lot of water throughout the day, but one of them is that it will reduce bloating in your face.
  • The reason water helps reduce face fat is because it flushes toxins out of your body. Thus, it also increases your overall health. It will also improve the look of your skin and hair.
  • Drinking cold water will burn extra calories. Drinking 64 ounces of water per day is a good target to strive for. Keeping the body constantly hydrated will make you feel better, and it should make your face look more slender over time. 

3. Eat the right foods for a healthier diet

  A diet that is low in processed foods and refined flour (like white bread and pasta) will be healthier for you. Instead, try to eat a lot of fresh vegetables and fruits, foods with fiber, fish, and other protein rich foods.
  • Try not to eat food with a lot of salt (avoid junk food as it’s loaded with salt). Salt encourages your body to retain more water, so it will bloat your face. Sugar is also linked to a fatter face. Processed carbs with a lot of sugar in them are going to cause face bloat. 
  • Although people who are underage should not drink alcohol, another negative side effect of alcohol is that it causes the face to bloat by dehydrating the body. Some good food choices include almonds, broccoli, spinach, and salmon. 

4. Determine whether you have food intolerance

 Sometimes food allergies or intolerance are to blame for a fuller face. See a doctor if you think you might have one.
  • As an example, some people have sensitivity to gluten and would benefit from eating gluten-free foods. Many restaurants and grocery stores are including gluten-free options these days.
  • Some people with irritable bowel syndrome sometimes think their faces are fuller as a result. Gastrointestinal disorders are fairly common, affecting about 15 percent of adults.
  • It’s also possible that hormones are causing your face to look fuller, such as PMS (or in older women, peri-menopause).

5. Try toning your face with facial exercises

  You can exercise your face to make it look slimmer. This works by strengthening facial muscles, reducing saggy skin in the face.
  • Try the cheek puff exercise. Simply take a deep breath and hold the air in your cheeks. Then push it to the other cheek. Do this several times throughout the day.
  • A smile exercise that tightens the cheeks and mouth is to smile and clench your teeth for a few seconds. Don’t squint your eyes. Then pucker your lips. Repeat. Do this on one side, and then switch sides.
  • Pucker your lips for five seconds. Hold the pucker on the right, then switch to the left side of your face. If you have an expressive face and use your facial muscles a lot , even just by smiling and laughing a lot – your face will look more slender.

6. Try creative options for slimming the face 

From blowing balloons to hot towel treatments, there are many ideas out there that are said to slim the face.
  • Blowing balloons will tone your cheeks because it exercises the muscles in them. Just blow a balloon and release the air in it, and do this 10 times. You should notice a difference in 5 days.
  • Try putting hot towels on your face because some believe steam can help you reduce cheek fat. The face will sweat and release some fat stored in your face. Just put the towel into warm water, and then apply it to your face. Some think steam can help slim your face by removing toxins from it.
  • Chew sugar-free gum for at least 20 minutes twice a day. This actually works as a facial exercise that will cut calories and tone your face. You could also try a facial massage using ginseng or wheat germ oil to stimulate blood circulation in the face. Start at your chin, moving upwards in a circular motion with your palms.

7. Master the art of contouring

  Many Hollywood stars use contouring to alter the shape of their faces, such as creating stronger cheekbones or slimmer noses.
  • To slim the nose, take a darker powder than your skin tone, and apply a thin line of it on each side of your nose. Then, use a brush to blend it along each edge. Use a highlighter to apply it above the eyebrows, and draw a line with it down the center of your nose. Blend it into your skin with a brush.
  • To contour the face, take a contouring powder, also darker than your skin tone, and draw it on your cheeks, angling down your cheeks. Smudge it in so it doesn't look like a harsh line. Use powder that is two shades darker than your skin. Contouring allows you to alter the shape and lines of your face.

8. Choose the hairstyle that makes your face look most slender

 Not all hairstyles are created equal. Depending on your face shape, a hairstyle can make your face look rounder or slimmer.
  • If your hair is long, don’t grow it past your chest, and have a hairstylist create some soft layers to frame your face.
  • You want to create some curves in the hair around the face by the cheekbones and eyes, avoiding straight lines in the hair. Bangs will probably make your face look fuller if they are cut straight across.
  • You should avoid blunt cut bobs and instead go for a longer shaggier look with layers. Pulling the hair straight back will make your face look rounder by showcasing your temple. A high vertical bun gives the illusion of a slimmer and longer face.


7 Easy Ways to Get Soft Lips

Every girl dreams about sexy soft lips. Lips that simply ask to be kissed. However, not every girl can have them, without some extra effort. Here’s what you need to do. There are 4 easy steps you need to follow, in order to get soft lips. None of them is anything special, it’s not like you have to bend over backwards. It’s simple, and fast, and it gives results.

1. Drink a Lot of Water

attractive caucasian smiling woman isolated on white studio shot drinking water
The general rule for being healthy, and looking good, is to be well hydrated. Your lips also crave for hydration  so, drink a lot of water.
If you’re not providing your body with enough water, your lips can, as well as your skin, get dry and chapped. It’s not a pretty sight, and plus – it hurts! Luckily, it can all be prevented simply by taking more water. Increase the amount of water you drink by just one glass, and you’ll see the results very soon.

2. No Licking

Woman Licking Her Lips
A lot of women think that the solution for dry lips is to lick them. However, this is completely wrong. Even though it could give you an instant feeling that your lips are softer, in a matter of seconds they will be even drier than they were, before you licked them. You’ll want to lick again and you’ll make your lips drier and drier. Apply a lip balm  don’t lick your lips.

3. Wear a moisturizing lip balm everyday

 Use a balm with shea or cocoa butter for the best results. Make sure to reapply frequently throughout the day when your lips begin to feel dry (usually about every two hours).
  • Apply lip balm every morning underneath any other lip products that you use, including lipstick, lip gloss, and lip stain.
  • Choose the product that sounds most appealing to your condition. Some lip balms are medicated and others contain strong mint extracts that might be irritating to some. Read the label of a lip balm before buying it to ensure that you are not allergic to any of the ingredients.
  • Common lip balm brands include: Burt's Bees, Blistex, Carmex, Chapstick, C.O. Bigelow, Nivea, Softlips, EOS, and Banana Boat. 

4. Homemade Honey Lip Scrub

Honey is a humectant, which means it locks moisture in to your skin. A little honey combined with sugar (to gently exfoliate) and almond oil rubbed gently onto the lips will moisturize and slough off dead skin. You can even eat the scrub! We also have a pumpkin spice version (complete with balm recipe) if you want to keep it seasonal.

5. Brush with a Soft Toothbrush

If slathering honey and sugar on your lips doesn’t sound appealing (hey, to each her own), try a very gentle scrub with the softest toothbrush you can find, one to two times per day, to exfoliate.

6. Homemade Beeswax Lip Balm

The beeswax in this DIY balm creates a protective layer on your lips—so you won’t be reapplying on the hour. Including honey makes for an effective chapped lips treatment.

7. Drink Plenty of Water

Good life advice, and even better advice when it comes to dry, flaky lips. If you’re hydrated, your lips will be too. If you’re having trouble getting to 64 ounces each day, try these hydration hacks.


6 Stylish Men’s Undercut Hairstyles in 2016

1. The Classic Undercut

For something a little more conservative, go for a classic undercut which still maintains trimmed sides, but leaves the top not too long. The classic undercut is recommended for those who may be a little apprehensive about this haircut because it is relatively simple and isn’t too extreme. Styling the classic undercut is simple, and a bit of hair product will keep it clean and polished. A wet look gel or mousse will give this cut a forties/fifties touch which can be great to change the proportions up.

Classic Undercut

2. Layered Undercut

For something a bit different, a layered undercut is what you will want. This version of the undercut is also advised for those who want to add fullness and depth to your hair from a visual perspective. By adding layers, this will visually amplify your locks, working to make the hair look more voluminous. You should also determine to what degree you wish to layer your hair. This means when you’re getting your hair cut by a barber, you should start off by cutting shorter segments off your hair, and then proceed to take off longer portions if you are liking the way it suits your face.

Textured Uppercut

3. Slicked Back Undercut

The trick to pulling off the slicked back undercut is to ensure your hair is long enough up top for the styling of this version of the undercut hair trend. You’ll want your hair longer and the key to ensuring it looks polished is to use a great quality hair product to tame the longer proportions up top. For a more modern take on the slicked back undercut, opt for a matte hair mousse to keep things relatively textured. For a more old school adaptation of the trend, a wet look hair product will ensure the cut looks more structured whilst maintaining a relaxed reference to the past.

Slicked back uppercut

4. Side Swept Undercut

The side-swept version of the undercut is best channeled in pompadour-esque styling. Much like the slicked back undercut, the first step to harnessing a side swept undercut is to ensure you have longer proportions up top so the slicking of the hair works well with the shorter sides of your haircut. The key to pulling off the side swept undercut is to make sure that you are parting your hair the right way. This differs for everyone, so ensure that you are choosing the best part for your face. This is generally determined by which way your hair naturally falls.

SideSwept

5. Puffy Undercut

The one thing that you will need to pull off the puffy undercut is a lot of volume and texture. This version of the undercut is also dependent on the kind of hair that you naturally possess. Gentlemen with curlier or wavier hair types will find this styling easier to recreate, particularly when it comes to applying product to your hair to enhance your natural waves. For men with straighter hair types, creating more texture with the layering of your hair is important and will aid when it comes to styling a puffy undercut. Keep in mind that matte hair product works nicely with this version.

Puffy Undercut

6. Disconnected Undercut

The disconnected undercut relies on a stark contrast between your hair up top alongside the shaven sides of your hair, distinguished with a line. There is a refined way to interpret this version of the undercut and it comes down to styling. Our advice? Adopt this version with a forties inspiration, maintaining a side part and products which will make your hair look more glossy to amplify the retro elements of your styling.

Disconnected

Tuesday, April 26, 2016

6 tips at home remedies for shiny hair

 Here are 6 tips at home remedies for shiny hair:

1. Eggs

Eggs are perhaps one of the best ingredients to provide nourishment and shine to your hair in minutes. Being a good source of protein, fatty acids and lecithin, eggs help repair damaged and dull hair by adding moisture and shine. Eggs also help make your hair strands strong and thick.

home remedy for smooth and shiny hair
  • Mix one egg white and one tablespoon each of olive oil and honey until you get a smooth paste. Apply this paste on damp hair and scalp. Cover your head with a shower cap for about 30 minutes. Then wash your hair with a mild shampoo and cool water.
  • Beat two eggs until you get a foamy texture. Mix in two tablespoons of almond oil and one-half cup of yogurt. Apply this mixture on your hair and scalp. Cover with a shower cap for 30 minutes and then shampoo your hair with cool water.
Follow either of these egg treatments once a week to get soft and shiny hair.
Note: Never rinse your hair with hot water after using an egg mask. Hot water will clot the egg and it will be very difficult to wash it out of your hair.

2. Beer

Beer works as an excellent hair tonic. The proteins (hops and malt) in beer help repair damaged hair cuticles and provide nourishment to hair follicles. This in turn adds luster and shine to your hair.
  1. Wash your hair with shampoo and then apply flat beer from the root to the ends.
  2. Massage the beer thoroughly into your scalp using circular motions.
  3. Allow it to sit for about five minutes and then rinse it off.
  4. Follow this remedy once every two weeks.

3. Coconut Oil

To get shiny hair, it is important to provide nourishment by applying oil to your hair regularly. Coconut oil (organic and unrefined) is one of the best options. It helps restore moisture to dry and damaged hair, in turn making it shiny and healthy.
  • Apply warm coconut oil on your hair, from the root to the ends. Massage for a few minutes and then wrap your hair in a shower cap or towel for at least 30 minutes. Rinse your hair with water, then shampoo and condition like normal.
  • Another option is to add a few curry leaves to two tablespoons of coconut oil. Heat it until warm. When cool, massage the oil gently onto the scalp and hair. Cover with a warm towel for 30 minutes and then wash with a mild shampoo.

4. Mayonnaise

Mayonnaise has amino acids, protein and antioxidants that will make your hair strong, soft, healthy and shiny.
  1. Use one-half to one cup of full-fat mayonnaise, as needed for your hair length.
  2. Apply it on freshly washed, damp hair.
  3. Cover your hair with a shower cap for at least 30 minutes.
  4. Thoroughly wash your hair using cold water and a mild shampoo.
  5. Repeat this remedy on a weekly basis to enjoy hydrated and shiny hair.

5. Apple Cider Vinegar

Apple cider vinegar is a fabulous hair conditioner that can make your hair soft, shiny and moisturized. It also helps remove built-up residue that makes your hair look dull and lifeless. Plus, it can help treat dandruff, itchy scalp and frizzy hair.
  • Mix together equal parts of apple cider vinegar and water. After shampooing, pour the mixture into your hair and massage it onto your scalp. Let it sit for a few minutes before rinsing thoroughly with cold water.
  • Alternatively, mix two teaspoons of apple cider vinegar and the juice of one lemon in one cup of water. Use this mixture as a final hair rinse after shampooing.
Use these remedies only once a week.

6. Avocado

Avocado contains nutrients that will deeply moisturize and nourish your hair. This in turn will make your hair smooth and shiny. Avocado is also extremely good for dry and damaged hair.
  • Mix one mashed ripe avocado with two tablespoons of extra-virgin olive oil. Apply this mixture on damp hair, from the roots to the ends. Cover with a shower cap for 30 minutes. Finally, rinse and shampoo your hair as usual.
  • You can also mash one ripe avocado and one ripe banana together. Mix in one-half tablespoon of almond oil. Massage this paste onto your scalp and spread it all over your hair. Cover your head with a shower cap for 30 minutes or more. Rinse thoroughly with lukewarm water and then shampoo your hair.

5 Ways making your face and skin look beautiful

Do you wish that you had absolutely beautiful, glowing skin? Follow along after the jump to learn how to
nurture and protect your skin so that it looks amazing as soon as you wake up in the morning.

1.Drink up Aim to get 6 to 8 glasses of water a day. The water will clear your skin and make it glow because it makes it easier for your body to flush out toxins quickly.
  • Carry a water bottle with you all day to make sure you always have water on hand.
  • Drink herbal tea or other non-caffeinated beverages to hydrate when you're tired of water.
2.Eat a healthy diet
 
Healthy proteins and nutritious fruits and vegetables go a long way toward making skin glow. Add these elements to your diet to see quick results:
  • Omega 3 fatty acids. These are found in fish and walnuts, and are especially beneficial to your skin.
  • Vitamin C. This will help existing pimples heal faster, so eating a few servings of citrus fruits and spinach will help.
  • Fiber-rich foods. Fresh vegetables, nuts, and unprocessed fruit helps keep a fine balance and to be regular, not sluggish, in the gastrointestinal area. You may look and feel tired and sickly (headache and abdominal complaints), if you do not have regularity of elimination/movements once or more every day.
3.Prevent acne before it starts
 
Here are some small daily-life hacks you can use to prevent pimples before they happen:
  • Change out your pillowcase every four or five days. A fresh, bacteria-free pillowcase can stop your skin from erupting overnight.
  • Keep your hands off your face. If you tend to rest your chin in your palm, or you're constantly fussing with your face, stop. The oils on your hands can cause breakouts, even in small amounts.
  • Tie your hair back while you sleep. If you have long hair, keep it off your face while you rest. Braid it back, and use pins or a headband to keep bangs off your forehead.
  • Get your beauty rest. Stress can lead to breakouts, so make sure you're well-rested and calm.
  • Change your birth control (females). Some oral contraceptives containing estrogen can calm down regular breakouts. Ask your doctor if this is the right choice for you.
4.Wash your face at night 
 
Over the course of the day, makeup, dirt, and oil build up on your face. Make cleansing your skin part of your bedtime routine.
  • Use makeup remover. Not only does this prevent it from clogging up your pores and causing breakouts while you sleep, it also stops you from smearing bacteria on your pillow  where it can get into your skin night after night.
  • Use a gentle soap. Remember that you want to clean your skin, not completely strip it of all oils  if it feels tight and dry after washing, you're using something too strong.
  • Avoid the eye area; the skin around the eye can be too delicate for most cleansers.
  • Rinse off by splashing water on your face. Using a washcloth or rag to roughly wipe your skin clean can irritate it more. Instead, bend your face over the sink, cup your hands together, and bring up small amounts of water to splash over your face. About 10 splashes should do it.
  • Pat dry. Don't roughly rub your skin dry with a towel. Instead, dry it with small, gentle pats or let it air dry.
 5.Smooth on some moisturizer

 Using lotion in the morning acts as a primer for your makeup, helping it "stick" to your face throughout the day. Moisturizing at night helps your skin repair itself and stave off wrinkles. Bottom line, it's one of the best things you can do for glowing skin over the long term.
  • Consider using a lighter moisturizer during the day. If you're prone to breakouts, save the heavy cream moisturizer for nighttime and use a light or gel moisturizer during the day.
  • Don't forget your neck and décolletage. These areas can get super dry and irritated if you never moisturize them.