Microsoft Office InfoPath is the part of Microsoft Office. With Microsoft Office InfoPath, you can design a form that is connected to a Microsoft Office Access database. By using these two programs together, you get all of the data collection advantages of InfoPath along with the data storage advantages of Access.
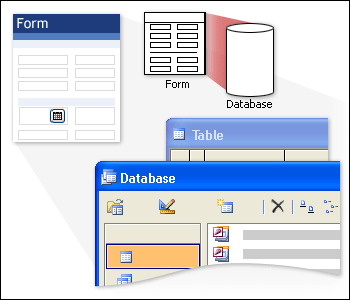
When you connect an InfoPath form to an Access database, you can choose whether you want to set up the database as the form's main data source or secondary data source. If you want to edit and add records to the database by filling out fields in the InfoPath form, you should set up the database as the form's main data source.
This article explains how to set up a database as the main data source for a form by doing the following:
-
Connecting the form to the database
-
Laying out the form
-
Customizing the submit options for the form
-
Querying and submitting data while filling out the form
Setup requirements
To complete the lessons in this article, you need to have Access 2003 and the Northwind sample database for Access installed on your computer. By default, the sample database is installed in the following location: <drive>:\Program Files\Microsoft Office\OFFICE11\SAMPLES.Note: If you cannot locate the Northwind sample database on your computer, you might need to install it. To do so, start Access, point to Sample Databases on the Help menu, and then click Northwind Sample Database.
Lesson 1: Creating the form
This lesson shows you how to create a new InfoPath form, and then how to use the Data Connection Wizard to connect your form to the Northwind sample database in Access. When you complete this lesson, your form will be connected to two tables in the Northwind sample database, and you will be able to add, edit, and query records from those tables.To use an Access database as the primary data source for an InfoPath form, you must start with a new form. You cannot modify an existing form to add a connection to a primary data source. Use the following procedure to create a new InfoPath form based on the sample database in Access:
-
On the File menu, click Design a Form.
-
In the Design a Form task pane, click New from Data Connection.
-
On the first page of the Data Connection Wizard, click Database (Microsoft SQL Server or Microsoft Office Access only), and then click Next.
-
On the next page of the wizard, click Select Database.
-
In the Select Data Source dialog box, browse to the Northwind sample database on your computer, and then double-click the database.
The default location of the database is <drive>:\Program Files\Microsoft Office\OFFICE11\SAMPLES.
-
Under Name in the Select Table dialog box, click the Suppliers table, and then click OK.
In this one-to-many relationship, the table on the "one" side contains a primary key field, which uniquely identifies each record in the table. The table on the "many" side of the relationship contains a foreign key field, which matches the other table's primary key. The primary key and the foreign key are often given the same name. In this case, the Suppliers table contains the primary key field SupplierID, and the Products table contains the foreign key field SupplierID.
When connecting your form to multiple tables in a database, InfoPath requires that the tables be connected by key fields. Also, the primary table in the data connection must have either a one-to-many or a one-to-one connection with any additional tables that you add.
Now that you have added the primary table to your form, you can add your additional table:
-
In the Data Connection Wizard, click Add Table.
-
Under Table in the Add Table or Query dialog box, click Products, and then click Next.
-
In the Edit Relationship dialog box, make sure that the two columns under Connecting fields are both set to SupplierID, and then click Finish.
Note: In InfoPath, fields with matching names from each table are considered to be key fields. If you are setting up a data connection where this is not the case, you need to specify the key field.
-
In the Data Connection Wizard, select the Show table columns check box.
-
Clear the HomePage check box.
-
In the Data Connection Wizard, click Next.
-
On the next page of the wizard, type a name for the data connection in the Enter a name for this data connection box, and then read the information in the Summary
box. The box should specify the type of connection (retrieve and submit
data to database), the location of the database, the name of the
primary table (Suppliers), the number of tables (2), and that form
submission is enabled.
-
After you verify that the information in the Summary box is correct, click Finish.
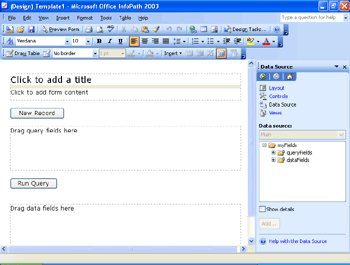
Before you go on to the next lesson, you should save the form:
-
On the File menu, click Save As.
-
If you are prompted to save or publish the file, click Save.
-
In the Save As dialog box, browse to the location where you want to save the form.
-
In the File name box, type Suppliers and Products.
Lesson 2: Reviewing the InfoPath data source
When you create a primary data connection between an InfoPath form and an Access database, InfoPath creates a data structure based on the structure of the Access database. Specifically, InfoPath creates fields and groups that match the fields and tables in the database. For example, InfoPath creates a Products group in the data source that corresponds to the Products table in Access. For each field in the Products table, there is a corresponding field in the InfoPath data source.Note: Because InfoPath stores the data before submitting it to Access, you can enter information into the form even offline, if you want and then submit that information to the database when you are ready.
For primary data connections, InfoPath actually creates two very similar data structures: a set of query fields and a set of data fields. You can use the query fields to enter values into your form and query the database. You can use the data fields to enter new records and modify existing records in the database. Each set of fields matches the tables and fields in the database.
To better understand how the InfoPath data structure relates to the Access data structure, it is helpful to look at the data fields in your form.
-
To see the data fields, in the Data Source task pane, expand the dataFields group.
-
Expand the d:Suppliers group, and then expand the Products group.
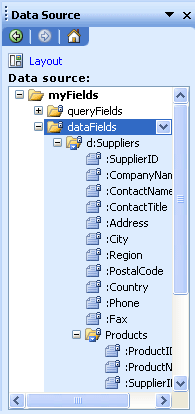
Note how similar the data structure is to the two tables in the Access database.
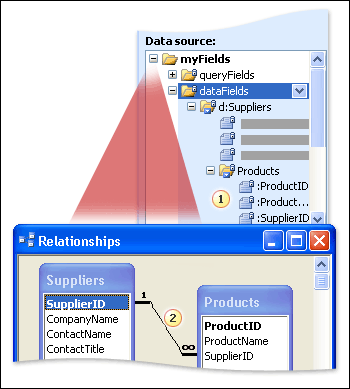
1. The Suppliers group contains the Products group.
2. The Suppliers table has a one-to-many relationship to the Products table.
For each table in the Access database, there is a group in the InfoPath form. For each field in the Access tables, there is a field in the InfoPath group. In addition, the groups and fields have the same relationships as the fields and tables for every supplier, there can be multiple products.
Lesson 3: Laying out the form
Now that you have created a form based on the Access sample database and familiarized yourself with the InfoPath data source, you can begin laying out your form. To create the controls into which users type information, you can drag the fields and groups from the Data Source task pane onto your form. When you drag a single field onto your form, it creates a single control, such as a text box. When you drag a group of fields onto your form, InfoPath creates a group of controls, such as a section that contains a set of text boxes.Tip
The type of control that is added to your form and its behavior depend on the type of field, which in turn is based on a particular field in the Access database. For example, an Access field with a Date data type results in an InfoPath field with a Date data type. If you drag that field onto the form, InfoPath creates a date picker by default.
When you create a form based on a database, InfoPath creates a single view with two layout tables. In the first table, you can add query fields, which allow your users to query the database for records. In the second table, you can add data entry fields, which allow your users to modify existing records and add new records to the database.
Before working with the query fields, you need to add the full group of dataFields to your form, which results in a full set of controls on your form. You can then remove any unnecessary controls. Some controls are unnecessary because they contain redundant information; others contain information that does not apply to the two tables that you are using. For example, the Category ID text box is not necessary because it is used to establish a relationship with a Category table, which you are not using in this data connection.
Note: Deleting a control does not delete the underlying field in the data source. For example, when you delete the Category ID text box, the CategoryID field still exists in the data source and can contain data.
-
In the form, place your insertion point in the layout table that contains the text Drag data fields here.
-
In the Data Source task pane, right-click the dataFields group, and then click Section with Controls on the shortcut menu. This inserts controls for all of the fields that you use to modify and add records.
-
In the form, select the second instance of the Supplier ID text box and the Category ID text box, including their labels, and then press DELETE.
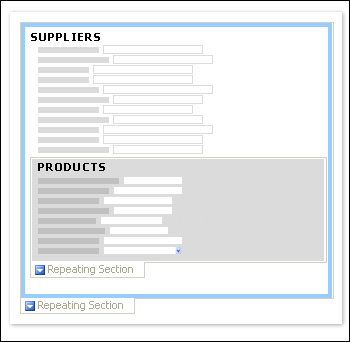
To make it easier for users to work with these repeating sections, use the following procedure to add borders and shading, and insert descriptive titles:
-
Right-click the second Repeating Section label that appears on the form, and then click Borders and Shading on the shortcut menu.
-
On the Borders tab in the Borders and Shading dialog box, click a color in the Color box.
-
In the Width box, click 3 pt.
-
Under Presets, click Outline, and then click OK.
-
Right-click the first Repeating Section label that appears on the form, and then click Borders and Shading on the shortcut menu.
-
In the Borders and Shading dialog box, click the Shading tab, and then click a color in the Color box.
-
Click OK.
-
In the form, type DATA ENTRY above the Suppliers repeating section.
-
In the Suppliers repeating section, place your insertion point before the Supplier ID label, and then press ENTER.
-
Type SUPPLIERS.
-
In the Products repeating section, place your insertion point before the Product ID label, and then press ENTER.
-
Type PRODUCTS.
-
Make all the text that you just typed bold.
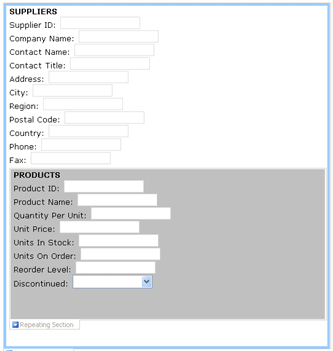
When you submit a new record to the Access database by entering data in your form, Access creates the Supplier ID automatically. Because of this, your users won't need to edit or type a new Supplier ID. This means that you can make the Supplier ID text box read-only, which prevents users from trying to modify the value. To make the Supplier ID text box read-only, do the following:
-
Double-click the Supplier ID text box.
-
In the Text Box Properties dialog box, click the Display tab, and then select the Read-only check box.
Lesson 4: Working with buttons and query fields
Before creating controls for querying the data, let's look at the two buttons InfoPath added to the form: the New Record and Run Query buttons. This lesson explains how these buttons function and demonstrates how to modify them.The Run Query button queries the database based on values in the preceding controls. The database then returns any records that match those values. For example, if you enter Tokyo Traders in the Company Name box, and then click the Run Query button, the record for the Tokyo Traders supplier will be returned, as well as all of the products that Tokyo Traders supplies. The returned records are displayed in the data entry part of the form, where you can edit them and then submit the changes to the database.
The New Record button clears the values in the data entry part of the form, allowing you to enter a new supplier and its products.
To help your users better understand the difference between the query and data entry parts of the form, you can add a title and text to the form:
-
Place your insertion point in the layout table cell that contains the text Click to add a title, and then type Suppliers and Products.
-
Place your insertion point in the layout table cell that contains the text Click to add form content, and then type To
query the suppliers, type a value in one or more of the boxes in the
Query table, and then click Run Query. To enter a new record, click New
Record, and type values in the Data Entry table.
-
Place your insertion point in the layout table that contains the text Drag query fields here, type QUERY, and then make the text bold.
-
Press ENTER.
-
In the Data Source task pane, click the queryFields group to expand it.
-
Right-click the q:Suppliers group, and then click Controls in Layout Table
on the shortcut menu. This inserts controls for querying the records in
the database based on the suppliers. In addition, it lays out the
controls and labels in a layout table.
Note: You can use this technique to lay out your data entry controls, as well.
-
In the query table you just added to the form, right-click the Contact Name row, point to Delete on the shortcut menu, and then click Rows.
-
Delete the remaining rows, except for SupplierID, CompanyName, and Country.
Lesson 5: Customizing the submit options
When users fill out your form, they can modify existing records and add new ones. To update the database with their changes, the completed form must be submitted to the database. By default, InfoPath makes the Submit command available on the File menu and on the Standard toolbar so that users can easily submit the completed form. In addition to these options, it can be helpful to provide a button directly on the form that enables users to submit the data. This lesson demonstrates how to set up a standard Submit button and customize other submit options for your form.-
Place the insertion point at the end of your form. Make sure that it is not within a repeating section.
-
On the Insert menu, click More Controls.
-
In the Insert controls list in the Controls task pane, click Button.
-
Double-click the button icon that was inserted into your form.
-
In the Action list in the Button Properties dialog box, click Submit.
-
In the Submit to box in the Submitting Forms dialog box, click Database, and then click OK.
-
In the Label box in the Button Properties dialog box, type Submit Form.
-
On the Tools menu, click Submitting Forms.
-
In the Submitting Forms dialog box, click Submit Options.
-
In the Submit Options dialog box, click Create a new, blank form.
-
Select the Instead of default message, show custom message check box.
-
In the Success message box, type The supplier and product information has been updated.
-
In the Failure message box, type The data was not submitted successfully. Please try again.
-
Save the form to ensure that your changes are retained.
Lesson 6: Querying, editing, and adding records
Now that you have finished creating your form and connecting it to an Access database, you should test the form to make sure that it will work correctly for your users. In this lesson, you take on the role of a user and test the form by querying the database, modifying existing records, and adding new records.First, you should try to open a new form and add a new record:
-
On the File menu, click Fill Out a Form.
-
In the Fill Out a Form dialog box, click Suppliers and Products.
Note: If you do not see the Suppliers and Products form, click Open to browse to your form.
-
To enter a new record, type Coho Winery in the Company Name box in the Data Entry part of the form.
Note: You do not need to type a Supplier ID because Access will create that automatically when the record is submitted.
-
In the Product Name box, type Merlot.
-
Under the Products repeating section, click Insert item to insert another product in the form.
-
In the second Product Name box, type Chardonnay, and then click Submit Form.
-
If a dialog box appears asking whether to allow the page to access data on another domain, click Yes.
Now that you have verified that users can add a new record to the database by using your form, you can try to modify one of the records:
-
In the Company Name box in the query part of the form, type Coho Winery, and then click Run Query.
-
If a dialog box appears asking whether to allow the page to access data on another domain, click Yes.
The data entry part of the form should display the supplier and the two products that you entered in the previous exercise.
-
In the Quantity Per Unit box in the Merlot record, type 12.
-
In the Chardonnay record, click the shortcut menu button that appears in the upper-left corner of the selected section, and then click Remove Products. The Chardonnay record is deleted from the form.
-
Click Submit Form.
-
If a dialog box appears asking whether to allow the page to access data on another domain, click Yes.
Summary
When you apply these steps to your own database, keep in mind the following key issues:-
When making a primary data connection between an Access database and an InfoPath form, you must start by creating a new form.
-
When you connect your form to more than one table, the tables must be connected by key fields.
-
Make sure to exclude long data types, including Memo and Hyperlink.
No comments:
Post a Comment